Wednesday, July 21, 2010

Miscellaneous Happenings

There are always some miscellaneous things going on that loosely relate to my first old house.

Example 1: Dirt Bags vs. Rice Bags. Homemade corn hole bags, engineered from scratch. Not too shabby, in my humble opinion.


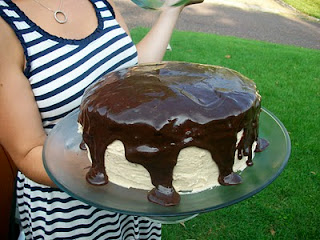
Example 2: Lindsay's cake. She took the recipe from a friend's blog (who took it from another blog), but I think it turned out pretty good. This is it before it got eaten. I think it needs a good name, so I have proposed "Peanut Butter Dynamite Cake".


Example 3: Lindsay's bulbs came up in our front yard just in time for Easter. Here is an "Old House at Easter" shot.

Big Blue Monster

When we first bought the house, we had painted the kitchen white as a "placeholder", since we didn't know what color we actually wanted. Although I had grown fond of the white, Lindsay didn't like it. 8 months later, we decided to paint the kitchen the same color as our two-kitchens-ago kitchen, a color called "Deep Sea Dive". Here's the painter herself:


And the newly painted wall:


If you're saying "Ugh!", don't worry… you're not alone. We said ugh too, so it didn't actually even make it to all of the walls. Clearly this color wasn't working, so we tried out a couple others.


The Last of the Blue (see: The Last of the Mohicans) -- being swallowed up by one of the paint samples. To be completely honest, I can't remember if we went with the right or the left, but I think it was the right.


All finished up. Look forward to a "complete kitchen" picture sometime … well, eventually.

Tuesday, July 20, 2010

Kitchen Cabinets

We have a blank wall in our kitchen, so we are putting in a new bank of cabinets -- uppers and lowers. This is part of an "overall kitchen makeover" which we started when we bought the house. It started with the floors (check), painting the existing cabinets (check), getting new cabinets (in progress), painting (check -- see next post!), and getting new countertops (no check). Anyway, here are some pictures.

We bought unfinished cabinets from Lowes. First, I use my trusty sander with 200 grit paper to make a nice finish. Then a coat of primer and 2 coats (or more) of paint to get a nice smooth look.


After primer:


All finished:


This picture demands some explanation. I had planned on getting some plywood and cutting it to fit the top of the lowers so we could actually use this cabinet's countertop while we were "in-progress". However, after pricing plywood, I decided there had to be something I had laying around that could work (and be free!). I had this piece of drywall laying around downstairs, leftover from the closet repair (see a previous post). After cutting it to fit, it actually works pretty well. Stylish too, with my ducktape border! :)

Saturday, March 6, 2010

The Dining Room Light

For a long time, we have wondered about the "mystery switch" in our dining room. There's a light switch, but no light. We had investigated the ceiling, and thought that one place looked like it might have once had a ceiling light. In addition, it was in about the right place. Lindsay decided to climb up into the attic and check it out. With a little guidance from me, she located the box. Eventually, we opened that sucker up from the bottom. First try, right into the junction box. Of course, the power was turned off at this point. Notice my excellent choice of footstool.


After opening up a sufficiently large hole to pull the wires out, I noticed they were ... gross. This box had been sealed up before the advent of wire nuts and modern electrical tape, plus all the connections were made with soldered pig tails. It was pretty much disgusting. After clearing off all the gook, we tested the circuit. Success! Apparently the "mystery" light switch wasn't such a mystery after all.

Flash forward about a week (to yesterday). Knowing the circuit was a go, we tested to make sure the light actually worked. Again, success. And a funny picture.


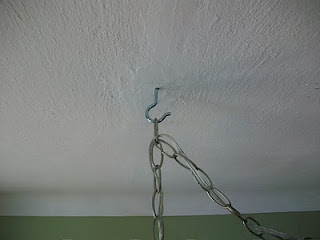
What remains? To actually hang this sucker. In order to put a secure hook into the ceiling, I wanted to make sure I was screwing into one of our rafters. Since the junction box wasn't actually screwed into a rafter, I went into the attic and measured the distance from the box to the rafter. Next, I estimated where the rafter should be based on my measurement. Then I used a stud finder to find the position of the rafter in two positions near my position. Finally, I drew a line between my measurements (linear regression ftw), and I screwed that sucker in. Success! Of course, being the engineer I am, I had to go back up into the attic to get a confirmation before I hung anything from it. (Hanging a chandelier on a hook that falls out of the ceiling goes under the category of "Man, that was stupid.")


Anyway, I'll cut to the chase. We're pretty happy with it. VoilĂ !


You may have been wondering, "What's Lindsay doing anyway?" She probably would have been watching TV, but it turns out that this light is on the same breaker as our TV. So no dice. Instead, she was planting vegetables in her cool little inside planter deal. Check it out!

New Vanity

We have always hated our vanity. This is the best "before" picture I can find, but, by this point, we had already pained the cabinet doors, so it looked a little nicer than it started. Either way, it was one of those "necessary evils" that we were living with, because vanities are expensive, and we are saving for bigger fish (fishes?). A couple weeks ago (yes, I'm catching up!), Lindsay saw a vanity on sale at HD for $40. So we jumped on that. To my credit, it only sat in our living room for a couple days before I decided it was vanity day. It ended up staying like ... this ... for awhile.


For some reason, the builder did not include on/off knobs for the water supply to the vanity, so I had to shut off the water to the entire house to install it. This is/was a pain, so I decided to install some knobs myself. As it turns out, the supply lines running to this vanity are a strange breed -- I couldn't find the fitting anywhere! So our bathroom was a bit of chaos for a few days until I decided to give up and just install them like it was before -- knob free. In any event, it looks like this now:

Foundation Repairs

So about 2 months after we moved in, we discovered there was a foundation wall on the west side of our house that would seep/leak during a bad rain. It was pretty close to the drain, but it was still annoying. So about 5 months ago (I know, I'm a bad blogger), I fixed it. It's not too difficult, plus working with concrete is fun. In this case, I used hydraulic cement. Before hand, I cleaned out the joint really well with a steel brush and a "chisel" (see: screwdriver).


I have several other spots I would like to shore up, and then we have plans to 'whitewash' the basement walls with Drylok paint. I'm told that's a real joy, so I'm sure it'll warrant a blog post! :P

Sunday, October 25, 2009

Slideshow Addendum

Addendum:

Lindsay reminded me that I had forgotten our favorite before & after. I didn't notice until I had put it on the slideshow -- it's kinda like one of those weight loss commercials where the before image, usually black & white, shows the guy hunched over and smoking a cigarette or coughing, while the after image, in beautiful color, shows the guy frolicking in a field of green. Well, maybe not quite so dramatic, but notice the tools and dust vs. strawberries and platters. At least I thought it was funny.

Saturday, October 24, 2009

Before & After "Slideshow"

We had our housewarming party on Sunday. I made a before and after slideshow for the party, but I'm a little late posting it. I decided to abbreviate it somewhat -- it was much longer!

Anyway, here's a before and after of the front of our house. Lindsay did all the landscaping and design -- I was just around for hauling bags. Also, she built almost all of the two-tier retaining wall -- it was going to be three-tiers, but Walmart stopped stocking our bricks, as they are a seasonal item. It's hard to see the far end of the wall, but it is five bricks high over there. (There's a whole story about the drainage over there -- basically, there was none, so I installed a new elbow and french drain before we got started. I'll spare you the details, but feel free to ask if you're interested.) There are some hidden bulbs planted too -- it should be really pretty in the spring!


My major project before the party was to finish the kitchen floors and cabinets. The whole process was: 1) Pull up the two layers of linoleum 2) Remove all the nails and staples from the floor 3) Use adhesive remover to get rid of the adhesive 4) Sand the floors with 40, 80, 120, and 220 grit paper 5) Apply wood stain (2 coats) 6) Apply polyurethane (3 coats). It was a lot of work, but I think it turned out pretty nice, plus it was cheap. Same deal with the cabinets -- we pulled them down, cleaned them with mineral spirits, lightly sanded, primed, and painted (Behr Premium Plus "Frost", if you're wondering). We also got new hardware, which I think looks really nice. We have a few more project ideas for the kitchen -- we are going to add more cabinets, a pantry, and an island. We're also planning to change the countertops -- something stone and dark. Anyway, here are some before and afters:


Finally, the story with Nibs. After she was back to health and being hyper in our house, we decided to drop her off at a wildlife rehab center. When she was there, she learned how to be a squirrel -- make a nest, forage for food, etc. When she passed rehab, she got to come home! She's living in a tree in our backyard now. Lindsay showers our backyard with corn regularly, so we get to see Nibs every once in a while. I won't tell you how long Lindsay staked out Nibs' tree to get the after shot :P

Sunday, October 4, 2009

This weekend

So the lull is over -- we've been doing more work on the house for the last few days. In particular, we've been working on the kitchen floor and the front yard. Without further ado...


There were a lot of old floors in the kitchen. #1 and #2 were the linoleum floors (most recent). (The black stuff on the floor is the adhesive -- I used Adhesive Remover (duh) to get it off the floor.) #3 is, in fact, a carpet threshold strip. Yes, there was carpet throughout the house, including the kitchen (eww) at some point. No carpet when we moved in, though. #4 is the new threshold for linoleum that was just screwed in over the carpet threshold -- pretty awesome. #5 is the screws, nails, and staples that I took out of the floor. Better pic coming up:


This is about 1 hours worth of removal. I ended up doing about 3 hours worth of removal all together. As such, I needed to get some wood filler to fill all those holes:


This picture was taken after I had sanded once with a 40 grit paper, and filled in some of the holes. I hope to be finished sanding and filling in a couple days. After that, I'll stain it a nice dark color, and slap on some polyurethane.

Next up -- the front yard. Lindsay has been chomping at the bit to put some landscaping in our front yard. The first goal was to remove the grass for about 5 feet in front of the house, and to remove some ugly bush/weeds we had growing. The sucker in the next picture was so heavy that the yard service wouldn't pick it up! (For the record, I couldn't either. I stole a trick from TV to get it out of the ground. I dug out all around it, sat down next to it, put my feet on the side of the house, and leg pressed it right out of the hole!) By the way, check out the spigot we uncovered!


Here's a teaser. We decided to build up a retaining wall (or three) and make a tiered front yard. It has turned out very nice -- some of the plantings are already in. Here's what it looked like after grass removal, before wall building. More when it is done!


Finally, in case you are following along, I didn't forget about the toilet. I ended up having to replace the hose from the wall to the toilet -- it was some old plastic part that had sprung a leak. I replaced it with a nice steel braided hose -- I feel like I need a Tim Taylor laugh here.

Wednesday, September 23, 2009

A lull

Sorry for the lack of activity around the house lately. Just thought I'd pop in to fill you in on what's going on, and what's taking up my time:

1) My best friend got married last weekend. I was partying out of town for awhile. No house work - woo!
2) My computer's hard drive died when I was installing Snow Leopard. It's a long story. My data is fine (horray), but I need to reinstall everything. (Transferring Information: 2 hours and 13 minutes remaining...)
3) The toilet tank started leaking.

Projects in various stages of completion:
1) The kitchen floor is about 85% stripped. I plan to finish the stripping and sanding by/on Saturday.
2) The patio has the cracks sealed. I am debating about whether to lay down a top layer of concrete and stain it, or just jackhammer the whole thing and start over (paver stones?)
3) The front lawn is missing some grass. (I started ripping out grass near the house to make way for flower beds today.)
4) The toilet has a tupperware container underneath it. I thought I fixed the problem with my trusty silicone tape, but it turns out it is still leaking (slowly). I need to go get a new gasket.
5) The backyard is mostly cleared. A few stumps to get rid of still. No fence yet. (The big stump on the side of the backyard laughed at my axe. Need to get some stump killer or a stump grinder.)

I'll post pictures when something is done. Check back in a year few days.

Wednesday, September 2, 2009

Photo Proof

My wife put up some pictures, including some semi-finished interior decorating stuff. I decided not to do a post on how to put up blinds, etc., so this will suffice:

http://www.flickr.com/photos/linnylou/sets/72157622186553190/

Nibs


No Joke. I was at Sonic, and this baby squirrel runs past my table while I'm waiting for the food to come out. She runs up to this table of 2 girls and 1 guy, and sits on the guy's foot. He tries to shake it off, but it won't get off, so he takes his sandal off. The squirrel just sits on the sandal, until he grabs sandal out from under it. They all get up and leave (after giving the squirrel a piece of bread), but the squirrel just sits there and looks sad/cold/lonely. I called Lin to come bring a box. She came and did her furry-animal-whisperer thing with it, and we ended up taking it home.

By our best estimations, she's about 6-8 weeks old. We're pretty sure she's a girl. At first, we had her in our kiddie pool with a laundry basket over her when we had to go out. After about 24 hours with her, I went and got a proper cage from Craigslist. We filled it with some branches for her to climb on. We were afraid she wasn't going to make it (she was very cold and hungry), but Lindsay has nursed her back to health. She's perked up a lot in the last 24 hours.

She's also surprisingly domesticated. She will sit in your hand (or on your head) to eat. She likes to climb and explore. Autumn (the dog) and Nibs (the squirrel) seem to get along pretty well. We're not sure what we're going to do with her when she gets older. Squirrels make pretty good pets (or so we've been told), but we might end up releasing her when she's old enough to fend for herself. We shall see. VIDEOS:


Thursday, August 27, 2009

Closet Disaster?


Our closet originally had two shelves and a single closet rod in it. Since we don't use the shelves to their capacity anyway, it seemed like a good idea to remove one of the shelves and add a second closet rod. I went to the store and bought this closet tension rod. You can see the results above, after Lindsay "was just trying to hang up a skirt." Clearly we have a problem -- a closet rod with skirtaphobia.

Since I already had a grudge against these stupid closet rods, I had kept the receipts and packaging in the event I would gleefully be able to return them to the store (which I did). With the proceeds from that transaction firmly in hand, I trudged to the next store to get this closet rod. I also had to pick up some nails, some Liquid Nails Interior, and some spray paint.


Since these closet rods mount to a wooden lip, I had to construct a wooden lip. Not too terribly hard -- I picked up some rough cut wood, cut four 18" sections, and sanded it smooth. Have I mentioned how much I love having a power sander? Love it. By the way, I would definitely recommend my Porter Cable ROS Power Sander if you are in the market. I decided to go with one that had solid reviews, and I do not regret it.


Anyway, after sanding, I spray painted those suckers white to match the white. 3 coats did the trick.


Next, I put both boards on the wall and moved the rod so it was level. Then I positioned the boards so they were level on the wall. After applying Liquid Nails to the back of the boards, I put them on the wall. Then I proceeded to nail them in.


Horray, finished! And with much more storage. You can see who gets the bottom rod :P