Saturday, September 4, 2010

Old Construction

The beauty of old construction is that it is stubborn and built to last, even when you want it gone. Case in point -- our kitchen walls. They are tiled, with red accents. Not the worst hand every dealt, but I am installing new cabinets and the tile has to go. I was just gonna carve out enough to put the cabinets in, but we decided to take it down to studs, drywall it, install the cabinets, and put a nice (new) backsplash in. Easy peasy, right?


Like I always say, the right tool for the job is essential to actually finishing it (and keeping your sanity). On the other hand, the right tool for the job is oftentimes expensive. Seeing as I didn't own a sledge hammer (and I'm cheap), we started the job with a normal hammer. After 10 minutes or so, I could tell it was gonna be impossible to finish the job in a timely manner with that wimpy little thing. In lieu of a sledge hammer, I decided to use my heavy duty axe (bought back when I thought I could take out the huge stump in our backyard with it - hah!). It's pretty heavy, and the back end is blunt, so it worked pretty well.


Here you can really see the construction of the wall. It's heavy duty. There are arguably 4 layers, including at least 2 inches of what Ask The Builder calls "Cement Mud" behind the tile. It's all laid on top of a metal lathe that was attached to the studs with a small piece of plasterboard (for an extra bump out). Believe me when I say it feels like hitting a thick cement wall.

Although the axe wasn't a bad solution (see: free), I really could use a sledge hammer. Luckily, we went garage sale-ing Saturday and I found one for $6-8, depending on how you count (I got $12 worth of tools for $10 -- the sledge hammer, a thin margin trowel, and a crow bar). When I got it home, I sanded the haft down smooth (220 grit) and put new "grips" on it with duck tape. Watch out, Wall!

Lawnmower Engineering

I use a reel lawn mower. Besides being cheap on gas (free) and maintenance (free) and fumes (none) and storage (little required) and self-fertilizing (kinda), I just like it. It's a little workout, but I have a small yard and it's not bad, especially when it's nice outside. That being said, my poor mower had a wobbly wheel for a long time. I tried to tighten the bolt up, but I couldn't get the wheel off to tighten the dang thing -- the wheel assembly is riveted together and bolted to the mower, so the access to the bolt is blocked by the wheel itself.


I dealt with the lemons life had handed me for awhile, but a few weeks ago the wheel itself just fell off. At that point, I decided I needed to do something to salvage my engineering pride. What to do? Drill a hole in the wheel, of course.


Actually, I drilled a hole in the wheel with a spade bit, but then I had to carve out a little more with my jigsaw to fit my socket driver in the hole. A few minutes later, we were back in business -- maintenance cost still $0. I'm planning on sharpening the blade myself as well, and I'll definitely post on that!

As an aside, what you DON'T want to do is cut into the actual rim part of the wheel. Although the inside does carry some compressive stress, the outside carries the majority of the stress (see: hoop stress). If you bite into the rim, you'll need to fix it with a hard plastic or a piece of wood to keep the wheel from bending (and wobbling).

Wednesday, July 21, 2010

Miscellaneous Happenings

There are always some miscellaneous things going on that loosely relate to my first old house.

Example 1: Dirt Bags vs. Rice Bags. Homemade corn hole bags, engineered from scratch. Not too shabby, in my humble opinion.


Example 2: Lindsay's cake. She took the recipe from a friend's blog (who took it from another blog), but I think it turned out pretty good. This is it before it got eaten. I think it needs a good name, so I have proposed "Peanut Butter Dynamite Cake".


Example 3: Lindsay's bulbs came up in our front yard just in time for Easter. Here is an "Old House at Easter" shot.

Big Blue Monster

When we first bought the house, we had painted the kitchen white as a "placeholder", since we didn't know what color we actually wanted. Although I had grown fond of the white, Lindsay didn't like it. 8 months later, we decided to paint the kitchen the same color as our two-kitchens-ago kitchen, a color called "Deep Sea Dive". Here's the painter herself:


And the newly painted wall:


If you're saying "Ugh!", don't worry… you're not alone. We said ugh too, so it didn't actually even make it to all of the walls. Clearly this color wasn't working, so we tried out a couple others.


The Last of the Blue (see: The Last of the Mohicans) -- being swallowed up by one of the paint samples. To be completely honest, I can't remember if we went with the right or the left, but I think it was the right.


All finished up. Look forward to a "complete kitchen" picture sometime … well, eventually.

Tuesday, July 20, 2010

Kitchen Cabinets

We have a blank wall in our kitchen, so we are putting in a new bank of cabinets -- uppers and lowers. This is part of an "overall kitchen makeover" which we started when we bought the house. It started with the floors (check), painting the existing cabinets (check), getting new cabinets (in progress), painting (check -- see next post!), and getting new countertops (no check). Anyway, here are some pictures.

We bought unfinished cabinets from Lowes. First, I use my trusty sander with 200 grit paper to make a nice finish. Then a coat of primer and 2 coats (or more) of paint to get a nice smooth look.


After primer:


All finished:


This picture demands some explanation. I had planned on getting some plywood and cutting it to fit the top of the lowers so we could actually use this cabinet's countertop while we were "in-progress". However, after pricing plywood, I decided there had to be something I had laying around that could work (and be free!). I had this piece of drywall laying around downstairs, leftover from the closet repair (see a previous post). After cutting it to fit, it actually works pretty well. Stylish too, with my ducktape border! :)

Saturday, March 6, 2010

The Dining Room Light

For a long time, we have wondered about the "mystery switch" in our dining room. There's a light switch, but no light. We had investigated the ceiling, and thought that one place looked like it might have once had a ceiling light. In addition, it was in about the right place. Lindsay decided to climb up into the attic and check it out. With a little guidance from me, she located the box. Eventually, we opened that sucker up from the bottom. First try, right into the junction box. Of course, the power was turned off at this point. Notice my excellent choice of footstool.


After opening up a sufficiently large hole to pull the wires out, I noticed they were ... gross. This box had been sealed up before the advent of wire nuts and modern electrical tape, plus all the connections were made with soldered pig tails. It was pretty much disgusting. After clearing off all the gook, we tested the circuit. Success! Apparently the "mystery" light switch wasn't such a mystery after all.

Flash forward about a week (to yesterday). Knowing the circuit was a go, we tested to make sure the light actually worked. Again, success. And a funny picture.


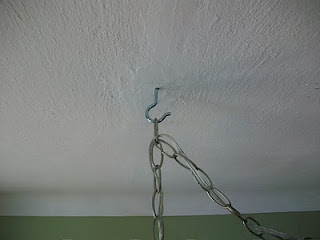
What remains? To actually hang this sucker. In order to put a secure hook into the ceiling, I wanted to make sure I was screwing into one of our rafters. Since the junction box wasn't actually screwed into a rafter, I went into the attic and measured the distance from the box to the rafter. Next, I estimated where the rafter should be based on my measurement. Then I used a stud finder to find the position of the rafter in two positions near my position. Finally, I drew a line between my measurements (linear regression ftw), and I screwed that sucker in. Success! Of course, being the engineer I am, I had to go back up into the attic to get a confirmation before I hung anything from it. (Hanging a chandelier on a hook that falls out of the ceiling goes under the category of "Man, that was stupid.")


Anyway, I'll cut to the chase. We're pretty happy with it. VoilĂ !


You may have been wondering, "What's Lindsay doing anyway?" She probably would have been watching TV, but it turns out that this light is on the same breaker as our TV. So no dice. Instead, she was planting vegetables in her cool little inside planter deal. Check it out!

New Vanity

We have always hated our vanity. This is the best "before" picture I can find, but, by this point, we had already pained the cabinet doors, so it looked a little nicer than it started. Either way, it was one of those "necessary evils" that we were living with, because vanities are expensive, and we are saving for bigger fish (fishes?). A couple weeks ago (yes, I'm catching up!), Lindsay saw a vanity on sale at HD for $40. So we jumped on that. To my credit, it only sat in our living room for a couple days before I decided it was vanity day. It ended up staying like ... this ... for awhile.


For some reason, the builder did not include on/off knobs for the water supply to the vanity, so I had to shut off the water to the entire house to install it. This is/was a pain, so I decided to install some knobs myself. As it turns out, the supply lines running to this vanity are a strange breed -- I couldn't find the fitting anywhere! So our bathroom was a bit of chaos for a few days until I decided to give up and just install them like it was before -- knob free. In any event, it looks like this now:

Foundation Repairs

So about 2 months after we moved in, we discovered there was a foundation wall on the west side of our house that would seep/leak during a bad rain. It was pretty close to the drain, but it was still annoying. So about 5 months ago (I know, I'm a bad blogger), I fixed it. It's not too difficult, plus working with concrete is fun. In this case, I used hydraulic cement. Before hand, I cleaned out the joint really well with a steel brush and a "chisel" (see: screwdriver).


I have several other spots I would like to shore up, and then we have plans to 'whitewash' the basement walls with Drylok paint. I'm told that's a real joy, so I'm sure it'll warrant a blog post! :P