Saturday, May 31, 2014

Final Addendum

First Old House!
If you have stumbled upon this blog and wondered why it ended somewhat abruptly, let me explain. We ended up selling the house and moving away from St. Louis in May of 2013. The reason was that I finished my doctoral program and took a job in Baltimore.

Proof I graduated!
We have a ton of great memories from St. Louis and the house. I state without proof that I finished every project at our First Old House with the exception of tuckpointing! We ended up selling the house quickly for our full asking price, and had only minor issues on the inspection. (We had to have some 'non-standard' plumbing replaced.) Some final parting shots of the little house that could:

Skeeter liked the window seat.

This one always looked like a post card to me.


Sunday, July 8, 2012

July Updates - Microwave and more

I have a new blog philosophy. I used to try to make sure to 'include' everything that was going on around the house, which led me to not blog for long stretches of time because I didn't have the energy to try to collect images from all the stuff I've been up to. Therefore, this blog is moving to 'updates about whatever I feel like' format.

I am now an accomplished microwave installer. You may remember the last time I installed a microwave in October 2011. I was pretty proud of the "deal" we got on the microwave ($42 + Cracker Barrel), but, as with most things that are too good to be true, the microwave stopped working after just a few months of operation.


We had been using our 'old molasses' standalone microwave, which works fine but takes up counter space. [edit: My wife tells me that I should indicate this is an inside joke. Whatever.] This weekend, we decided to splurge on a legitimate, brand-new microwave. To be honest, I did not drive the hardest bargain I could have, but we did end up taking home a floor model for less than $150. Unlike the first time I installed the microwave solo (would not recommend), this time Lindsay helped me. It is just one of those jobs where it is nice to have an extra pair of hands. Here is it:


By the way, I had another opportunity to use my awesome corded hammer drill again -- I used Tapcon screws to secure the mounting plate to the wall, since it's an outside/brick wall (no studs). Once again, I was struck with its awesomeness and may have been heard yelling, "Sheer Power!!" throughout the house.

We also decided to get some rugs for our living/dining room this weekend. It is something we have always said we were going to do, but never got around to it. I wish we had done it earlier -- they are really nice to have. Plus the animals love them too!


Finally, here's a picture of some zucchini that Lindsay picked out of the garden the other day. They are massive (and tasty)!


Saturday, June 2, 2012

Overdue Update

A lot of people have been asking me -- what have you been up to? Here are some updates. Lindsay and I spent some time working on a palette fence. She got the idea from Pinterest. One of the palettes became an herb garden, and the rest of them will be a fence along our backline. It's a work in progress, but here are some images Lindsay took.


On Wednesday, I took apart my reel lawnmower and sharpened the blade. I promised I would take pictures of the sharpening in process, but I failed. The general idea was to loosen the adjustment bolts on the blade, then rotate it around so I could clearly see the edge. After that, I just busted out my angle grinder with the appropriate disk, and sharpened the blade to a point. It wasn't razor sharp when I was finished, but it was good enough. It's important not to "oversharpen" one side compared to another, or your mower will cut funny. My mower was definitely overdue for a sharpen -- it feels brand new again!


Today, I put together another window sill for the kitchen. Unfortunately, I don't really like the dimensions, so I'm going to use it as a template to put together a final look. Anyway, here ya go:


In another episode of "righting other people's wrongs", I did a major clean-out of the mess of wires that have been accumulating in the basement. We had cable internet for awhile, but we decided to switch back to DSL about a year ago. I had always been annoyed that the guy that installed our cable decided to drill the hole for the coax line directly through one of my floor joists. It was a simple fix -- rip out the (now unused) cable, get the appropriate size wooden dowel, cut to size, slather with wood glue, and hammer it into place -- but it makes me feel much better. (The vertical "height" of floor joists is what gives them bending strength. When you remove a full-thickness piece of the joist, you seriously compromise its mechanical strength!)


I had an idea the other day that I had to try. In order to eliminate movement of our wooden floor (that causes squeaks), I had the idea to get some metal washers and screw the washer between the subfloor and the wood floor, effectively compressing the two. It actually works quite well -- a 'proof of concept' test was performed on a particularly annoying squeak next to Lindsay's bed side, and I could literally hear the squeak getting sucked up as I pulled the subfloor flush with the top. I plan to do some more of this in the future. Unfortunately, there is an access limitation, since air ducts and such get in the way.


We've had some really beautiful days here in St. Louis (and some really hot ones. And some really cold ones. Make up your mind, Weather!) -- here are a few shots I liked.


Hope you're having a great Saturday!

Friday, December 30, 2011

December

A lot of stuff happens in December. It's my birthday (Dec 11), Thanksmas (Dec 17), Christmas (Dec 25), and an extended trip of some sort (this year -- Cleveland, Dec 22 to 28).

As far as house news goes, I fixed our table. This hinge had been busted for about 8 months. I was never really sure exactly what was wrong with it, so I wasn't sure how to fix it. The method I used was: take off the matching hinge and bang the offending piece into the "right" shape with a large hammer. After I was done, I lubed it up with some "Liquid Wrench" and put it through the paces. Works like a charm!


Also, I got an air compressor (Porter Cable, 6 gallon, 150 PSI) and a pneumatic nailer (Porter Cable, 16ga finish nailer) for my birthday. I decided building a workbench extension from some spare lumber I had laying around would be a good first project.

The cuts:


The finished product:


I was really surprised at both how quiet and how useful the nailer was. I did use some screws, but the nail gun sped up the framing process substantially. I stole the design from the workbench I inherited from the previous homeowner. Basically, you make a box, put the legs in the corners, and secure the legs with blocking.

I put my new workbench to use already on a project that may be featured soon!

Saturday, October 29, 2011

Catching up

I have a lot of catching up to do. I have been watching too much Cardinals baseball (World Series Champs!), so I haven't been doing much else in the evening. Sorry! I was going to attempt to put things in chronological order, but I don't think there's much point. So here's a hodgepodge of things I did today as well as things we have been working on for the past few months.

Lindsay had to work this evening, so I had a chance to knock some things off my "Honey Do" list. The first thing I did was put the side panel on our pantry. That's the last piece of the puzzle as far as cabinets go in the kitchen.


The general idea with these panels is to use wood glue along with finishing nails. The wood glue gets the panel to stick nicely to the side of the cabinet, and the nails hold it there while it dries. I use some C-Clamps to hold it on while I'm working on getting the nails in.


Yes, I left my hammer on top of the pantry and spent half an hour looking for it.

By the way, in the last month or so, I made this round shelf thing and installed it.


I'm not 100% satisfied with the results -- cutting circles is an art I haven't mastered yet. In case you are wondering, the whole thing is made out of MDF. I finished it with a red oak veneer, then painted it. The shelves are glued and screwed. Attaching it to the wall was "fun". I didn't want any exposed screws at all, so I ended up recessing some toggle bolts to attach it to the wall (and normal bolts to attach it to the corner cabinet). In short, I drilled a small hole for the bolt shaft, then drilled a large hole for the bolt head - but only partially through the original hole. After everything was attached, I used wood filler to cover the bolt heads, then sand/prime/paint. Voila! (I took some pictures, but they were on my old phone and I forgot to transfer them before I sold it. Whoops!) EDIT: See a schematic here.


In other news, Lindsay found a microwave for $25 on Craigslist. We made a field trip to get it (about 30 minutes) and got Cracker Barrel on the way home (yum). I had to replace the handle (see: Wife wanted a new handle), so I bought one for $17 off Amazon and put it on. Final Cost: $42 + Cracker Barrel. Not bad.


Finally, we also put in a new ceiling fan. This was definitely a group project.


We had to kill the electricity, then take off the old fan and hang the new one. Unfortunately, I wanted to wait until the game was over (since the fan and the TV are on the same circuit). However, I also had to tutor from 11p to midnight (I tutor Calculus and Physics on tutor.com!), so we only had about a 45m window. As it turns out, this isn't enough time. So we ended up finishing it at like 12:30 or 1a. Wooooo!

The window behind the sink in the kitchen doesn't have a sill right now, since we ripped it out when we installed the new backsplash. Unfortunately, I have no experience with creating window sills. So I decided to experiment by using some scrap wood I had downstairs. Actually, it was part of the packaging of some furniture we bought like two years ago. I should probably throw some things out ...


Using my trusty jig saw and table saw, I made a template out of plywood scrap, then a 'final product' out of the aforementioned "wood".


I installed it to see if I like the size/shape. I can't decide if it should be flush with the tiles or come out a bit like it does now. Thoughts?


The final task for today was replacing one of the flanges on our outside fence. At some point, it broke. I went to Lowes and found a flange for it and replaced it.


This project was a good excuse to use my new corded hammer drill. (I also used it for installing the microwave. It was originally purchased for mixing tile adhesive / drywall mud.) Again, I bought a quality (read: expensive) drill that had good reviews and it totally was worth it. I installed a third concrete anchor, since previously there were only 2. This drill killed the 2" of concrete I had to drill through -- took about 10 seconds.


My lab is moving, so we are throwing out a lot of old stuff. I took possession of an old drill that didn't work anymore (or at least, the battery doesn't charge anymore). I had been needing a new case for my new drill, so I just ripped all the plastic walls out of it! It fits great!


We recently took a trip to our city's "free mulch pile" and loaded up our car for our new plants. We are always impressed with how much our little car can handle. Check it out!


I usually try to end with a cute picture of my wife, since she is prettier than my tools/projects. Hope you made it all the way to the end of this monster post. Phew.

Saturday, June 4, 2011

In progress

As per usual, I have been terribly lax at updating this blog. Either way, I'm back! We've been doing fairly continuous work, but I haven't been taking a lot of pictures. Some things of note:

* I got a faucet on clearance from Lowes. Being the king of negotiating, I took them from $175 ($285 retail) to ... $20 (with no Lowes card discount). I got the receipt to prove it!


* We bought what we thought was our last cabinet last week (the lazy susan). I finished it up and brought it upstairs to install. Even though the receipt said 36" x 36", it was only 28" x 28". What the heck? Apparently they expect you to build an 8" surround to put between the cabinet and the wall. After pushing it against the wall, we decided that we liked it better with a "stubby" countertop against the short wall. So I built the 8" shelf unit featured next to the pantry in the below images. I don't think I have any images of the construction (lame?), but it was fairly unexciting. I basically just copied the construction of the other cabinets.


So anyway, all the cabinets are screwed into the wall (and each other), just waiting for countertops. We ordered the countertops on 5/29, so they should be in any day!

To do list in the kitchen:
* Countertops
* Finish removing tile behind stove
* Drywall & Plaster
* Backsplash
* Floors
* Kickboard
* New Fan

So quite a bit, but it should go quickly.

* We bought an aboveground pool. It's filling as we speak. More pictures on this later!

* We heinously put our cat in one of the old cabinets.

Monday, January 3, 2011

New Year, New Projects

I have fallen behind on this blog. I blame computer problems (my main computer died and has since been replaced since this blog was updated), but that was really a minor inconvenience rather than a catastrophic blow to my blogability. (As it turns out, it only requires a minor inconvenience to totally incapacitate me. Probably a life lesson in there somewhere...)

Anyway, I wanted to recap what I have finished since this blog was last updated:
* The tile was completely removed from that kitchen wall.
* The outlet on that wall was moved up into the area where the new backsplash will go.
* The missing wall was replaced with drywall and painted.
* We had our bay window replaced. I didn't DIY this one so I wouldn't screw it up :P
* I built a window seat for said new window. Lindsay upholstered it. Skeeter sits on it.
--> This will eventually make it into the blog. Lots of fun pictures and "over-engineering-it" commentary to follow.
* I installed a new programmable thermostat.
--> Discovered that this is the house's 5th thermostat!
* I got a miter saw AND a table saw for my birthday.
--> First project: a work table for my new tools.

Coming up?
* Finish the kitchen
--> More tile removal, more cabinet hanging
* Rewire the basement
--> Subpanel and more electrical fun
* Floors
--> Refinish everything (including the kitchen, again =/)!
* Bathroom
--> Gut? We'll see what the budget allows.

Saturday, September 4, 2010

Old Construction

The beauty of old construction is that it is stubborn and built to last, even when you want it gone. Case in point -- our kitchen walls. They are tiled, with red accents. Not the worst hand every dealt, but I am installing new cabinets and the tile has to go. I was just gonna carve out enough to put the cabinets in, but we decided to take it down to studs, drywall it, install the cabinets, and put a nice (new) backsplash in. Easy peasy, right?


Like I always say, the right tool for the job is essential to actually finishing it (and keeping your sanity). On the other hand, the right tool for the job is oftentimes expensive. Seeing as I didn't own a sledge hammer (and I'm cheap), we started the job with a normal hammer. After 10 minutes or so, I could tell it was gonna be impossible to finish the job in a timely manner with that wimpy little thing. In lieu of a sledge hammer, I decided to use my heavy duty axe (bought back when I thought I could take out the huge stump in our backyard with it - hah!). It's pretty heavy, and the back end is blunt, so it worked pretty well.


Here you can really see the construction of the wall. It's heavy duty. There are arguably 4 layers, including at least 2 inches of what Ask The Builder calls "Cement Mud" behind the tile. It's all laid on top of a metal lathe that was attached to the studs with a small piece of plasterboard (for an extra bump out). Believe me when I say it feels like hitting a thick cement wall.

Although the axe wasn't a bad solution (see: free), I really could use a sledge hammer. Luckily, we went garage sale-ing Saturday and I found one for $6-8, depending on how you count (I got $12 worth of tools for $10 -- the sledge hammer, a thin margin trowel, and a crow bar). When I got it home, I sanded the haft down smooth (220 grit) and put new "grips" on it with duck tape. Watch out, Wall!

Lawnmower Engineering

I use a reel lawn mower. Besides being cheap on gas (free) and maintenance (free) and fumes (none) and storage (little required) and self-fertilizing (kinda), I just like it. It's a little workout, but I have a small yard and it's not bad, especially when it's nice outside. That being said, my poor mower had a wobbly wheel for a long time. I tried to tighten the bolt up, but I couldn't get the wheel off to tighten the dang thing -- the wheel assembly is riveted together and bolted to the mower, so the access to the bolt is blocked by the wheel itself.


I dealt with the lemons life had handed me for awhile, but a few weeks ago the wheel itself just fell off. At that point, I decided I needed to do something to salvage my engineering pride. What to do? Drill a hole in the wheel, of course.


Actually, I drilled a hole in the wheel with a spade bit, but then I had to carve out a little more with my jigsaw to fit my socket driver in the hole. A few minutes later, we were back in business -- maintenance cost still $0. I'm planning on sharpening the blade myself as well, and I'll definitely post on that!

As an aside, what you DON'T want to do is cut into the actual rim part of the wheel. Although the inside does carry some compressive stress, the outside carries the majority of the stress (see: hoop stress). If you bite into the rim, you'll need to fix it with a hard plastic or a piece of wood to keep the wheel from bending (and wobbling).

Wednesday, July 21, 2010

Miscellaneous Happenings

There are always some miscellaneous things going on that loosely relate to my first old house.

Example 1: Dirt Bags vs. Rice Bags. Homemade corn hole bags, engineered from scratch. Not too shabby, in my humble opinion.


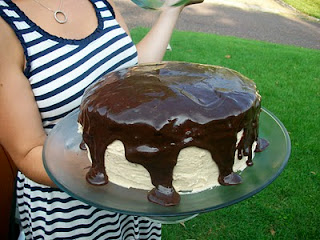
Example 2: Lindsay's cake. She took the recipe from a friend's blog (who took it from another blog), but I think it turned out pretty good. This is it before it got eaten. I think it needs a good name, so I have proposed "Peanut Butter Dynamite Cake".


Example 3: Lindsay's bulbs came up in our front yard just in time for Easter. Here is an "Old House at Easter" shot.

Big Blue Monster

When we first bought the house, we had painted the kitchen white as a "placeholder", since we didn't know what color we actually wanted. Although I had grown fond of the white, Lindsay didn't like it. 8 months later, we decided to paint the kitchen the same color as our two-kitchens-ago kitchen, a color called "Deep Sea Dive". Here's the painter herself:


And the newly painted wall:


If you're saying "Ugh!", don't worry… you're not alone. We said ugh too, so it didn't actually even make it to all of the walls. Clearly this color wasn't working, so we tried out a couple others.


The Last of the Blue (see: The Last of the Mohicans) -- being swallowed up by one of the paint samples. To be completely honest, I can't remember if we went with the right or the left, but I think it was the right.


All finished up. Look forward to a "complete kitchen" picture sometime … well, eventually.